Showing posts with label Made with Love. Show all posts

Tuesday, January 19, 2016

Not Just Blue....Blue Velvet

 
I was looking for something to lend itself to my recent need for blue.  What I found was something that not only added to the blue phase but something to also satisfy my sweet tooth.   Blue velvet cupcakes :-) 

My inspiration for these cakes came from One Particular Kitchen.  The recipe can be found here.  I did get some questions as to what makes a cake "velvet" versus just straight up cake...and I still can't really put my finger on the difference.  There is cocoa, vinegar and buttermilk in the recipe.  I don't usually add those ingredients to my cakes so I imagine the combination of them has something to do with the final product.  Most of the time the velvet cake is associated with the color red.  But since I was working with a blue theme I used blue food color to get the final look. 


They turned out very moist and just the right amount of sweetness.  The icing is cream cheese.  I do think I would try these again with a butter cream frosting instead.  The cream cheese was good but just a tad rich for me. 
 
I other winter news....since I've been held up inside I decided to finally put a couple recycled jars to good use.  I used a paint pen to draw snow flakes on an old sauce jar.  Then filled it with Epson salt and a votive candle.  It makes a nice addition to our dining table.
 
 
And I can check off the Richmond Frostbite 15K.  When I singed up for the race I had no idea it would actually snow the day of the race.  I'll just call that a bonus. 

 
I'm trying to convince myself that I love winter.  It's.  NOT.  Working.  Come on Spring.
 

Thursday, October 29, 2015

Tricks or Treats?

 
Emma's school is having a Halloween Party tomorrow.  I wanted to send in something that the parents would appreciate as much as the kids.  I think these just might work. 

Fruit cups + sharpie marker = Mini jack-o'lanterns.  I just hope the kids see them as treats and not tricks.  Otherwise I will have to make it up to them come Christmas. 

Friday, January 10, 2014

Winter Wreath

 I put up all of my winter decorations and felt like something was missing.  The front door needed a little extra pizzaz.  I figured a winter wreath would do the trick.  Within 20 minutes I had my new wreath and the just the pizzaz I was looking for.  You just need some fabric, an old wire coat hanger, scissors and maybe a tape measure.  I used pinking shears to add some fun to the fabric. 

The snow flakes really made it feel like winter

Just form the wire hanger into a circle
   

This measured 44 x 6 inches

And then I cut them into various size strips

Just tie the fabric onto the wire hanger


Voila

Silly teen photo bomb optional


Wednesday, February 13, 2013

Valentine Goodies

I wanted to make some homemade goodies for Valentine's but was short on time.  I turned to my favorite....Pinterest and my Valentine Board.  I had pinned this idea and decided to give it a try.  You'll need  square pretzels, Hershey Hugs and M&M candies.

Lay out the square pretzels on a cookie sheet covered with parchment paper.  Place individual Hershey Hugs on each pretzel. 


Bake for 4-5 minutes at 200 degrees.  The original site recommended just a couple of minutes but my oven must be on the cool side because they took a little longer.


After they have melted down (but before they are totally runny) remove from the oven and place an M&M on each one.  Let them cool and you are set to go.  If you want them to cool faster put the cookie sheet in the fridge for about 10 minutes. 


 Mine are going into jars so that I can give them to parents/family and friends.


Hope your week is going well!  Until next time.....

Friday, October 5, 2012

Apricot Pork Chops

Last Sunday I tried something I've never done.  I made a load of food and stuck it in the freezer so that on busy days I could just pull it out, nuke it and serve it up.  I was a little worried about putting all that food in my freezer simply because I had never done it before on this large a scale and how would the food all taste once I thawed it and cooked it?  Last night I had my first of the "freezer" food....and I'm happy to say it was great!  I tried a new recipe, apricot pork chops, and have to say they were a hit.    Really simple recipe over all but since it takes an hour to cook I'm glad I did it my way.

The original recipe came from Allrecipes.com and can be found here.  I tweaked it a little to make more.

1 jar of apricot preserves
10 ounces of Russian Dressing
1 packet of dry onion soup mix
8 pork chops (mine were just standard bone-in pork chops)

Mix the preserves, dressing and dry onion soup mix.  Pour over, under and mix with the pork chops.  Bake at 350 degrees, uncovered, for an hour.  After baking if you want to freeze them: let them cool, put into a freezer container or bag and freeze.  I divided mine into 2 containers and split the sauce between the containers.  To serve for dinner I pulled one container out the night before and left it in the refrigerator and then microwaved it for 4 minutes before serving.   

I really didn't think I would enjoy anything covered in apricot preserves...but with the dressing and onion mix it makes a tangy sauce that it super yummy.  I do think that you could make at least 10 chops and have more than enough sauce since it really cooks well.  Plus I cooked once and made two main dishes.  I'm always in the market to make more in less time.


Apricot pork chops


Saturday, September 8, 2012

A Bottle Tree

Not to get this tree confused with our Seasonal Tree....I now have a Bottle Tree.  Now if you are like a lot of folks you are probably scratching your head (hopefully not your a$$) and asking "What is a bottle tree?"  At which time I'll point you to this site and tell you to read on.  There are all sorts of versions and I happen to like making my own things...or having Mark make them for me...so that's exactly what we did.


For now we don't have a ton of bottles on it.  ButI think filling it up, bottle by bottle, will be part of the fun
 :-)  And for now the bottles are on there in a sort of uniform way....I plan on just putting the rest here and there to make it look more like a real tree would.  If you have any blue bottles or deep green and live in the area leave me a comment.  I'll take all you got.  Now if they happen to still have wine in them I suggest we become best friends and split the bottle....<evil grin> 

Mark and I are off this weekend to run in the Tough Mudder race....wish us luck! 

Friday, August 31, 2012

Mandarin Orange Cake

The weekend is finally here.  And it's a long weekend to boot!  Hells yeah!  I am super excited because
 1) we get to celebrate Christy's birthday 2) we get to celebrate my brother in laws birthday 3) we get to celebrate Labor Day....thats a lot of celebrating!  And along with celebrating that means FOOD!  I like fun and easy food and plan on making a few things. 

One thing I made last weekend that disappeared quickly was this Madarin Orange/Pineapple Cake.  Super easy and super yummy.


Need: one box yellow cake mix
1/2 cup of vegetable oil
1 can (think it was 12 oz maybe) mandarin oranges
1 can (20 oz) crushed pineapples
4 eggs
1 box (4oz) vanilla instant jello
1 tub of cool whip


Mix the cake mix, 4 eggs, vegetable oil, and 3/4 of the can of madarin oranges.  I didn't use all the juice out of the oranges but about 1/2 of it.  Mix all of these together.  This will help tear up the oranges (don't want them to remain whole pieces).  Bake the cake at 350 for 35-40 mins.  Then let cool.  I let mine cool about two hours.  Next mix the crushed pineapples (juice and all) with the jello and cool whip.  Spread this onto the cake.  Now you are ready to chow down. 

 
The last bite!


I didn't even get to take a picture of the finished product!  Only cake that got eatten down to the last bite!  Nice and cool for those warm summer days.  Give it a whirl and tell me what you think.  Have a super weekend peeps. 

Friday, July 6, 2012

Are we there yet???

Well we are finally at the start of the weekend.  And the Busy Bryants are coming to the start of another adventure!  This time we are taking our bus and heading out of the state....seems we just did that for some reason ;-)  Anyway....Tomorrow we all board up and head east to the great state of Tennessee.  We're joining 3 other families and staying in a king size home right on a river.  I am super excited!  The other families have been before and came home raving about it so now I am just like a kid wanting to know....ARE WE THERE YET?  You can take a virtual tour of the house here.  I am pretty sure that like our last vacation I will be MIA....sorry folks but adventures take a lot of work!  Until then some pretty pictures from our 4th of July celebration.


I made this cake like I made this one....yummy!


Hope everyone has a great weekend and in case I really do end up MIA then have a great week!  Do something fun...go have an adventure!


Wednesday, May 2, 2012

Rainbow Cake

I recently come across a recipe for a cake on the Betty Crocker Website.  It was for a cake that had multiple colors so to me it became the Rainbow Cake.  It had more steps than I was used to and of course I had to make it more "me" with sprinkles and goofy colors.  You use a simple box of cake mix (white cake), prepare the batter per the box instructions, divide it into three parts, add a different color to each part, pour the batter into pan (I think a bunt pan works the best) and layer the three parts of batter without mixing in between.  Bake per cake mix insturctions and voila!  I did the same with the icing and then just poured that over the top. 


I made this cake for Easter but everyone told me it looked like a Mardi Gras cake :)  I can totally see me doing this at Halloween with orange, black and purple and at Christmas with red, green and white.  Thank you Betty Crocker!

Wednesday, April 11, 2012

Angel Lush Cake

Remember about a week ago I posted a picture of a dessert I made?  Looked like this...


I know I was supposed to get you the recipe last week but that just didn't happen.  So here it is finally today.  I made another one for Easter since it was such a big hit at our house and since it's just that easy to make.  I got the recipe from the side of a can of crushed pineapple....was about to toss it out since I never use it...boy was I glad I kept it and tried it. 

You'll need: a large can of crushed pineapple, a small box of vanilla instant pudding, a cup of whipped topping, fresh fruit to garnish and an angel food cake. 

1. Cut the angel food cake into a top, middle and bottle layer. 
2. Mix the undrained pineapples with the instant pudding and whipped topping. 
3. Layer 1/3 of the pineapple mixture on the bottle layer of the cake and stack the second layer of cake on   
    top of that mixture.  And another 1/3 of the mixture on the second layer of cake.  Place the top of the
    cake on the second layer of mixture and top it off with the remaining pineapple mixture. 
4. Garnish with fresh fruit. 

I let mine sit in the fridge for about an hour to let the whipped topping and fruit set.  I used blueberries on both of mine but strawberries would be cute too or even bananas.


Step 1


Step 2


Step 3


Step 3


Step 3


Step 4

No baking, no special mixers or blenders needed and a total of about 15 mins to whip it up....EASY!  I made the second cake with lite whipped topping and "skinny" fruit so that it would be lower calorie and was still amazing.  Hope you enjoy!   

Wednesday, March 21, 2012

Cake Pops

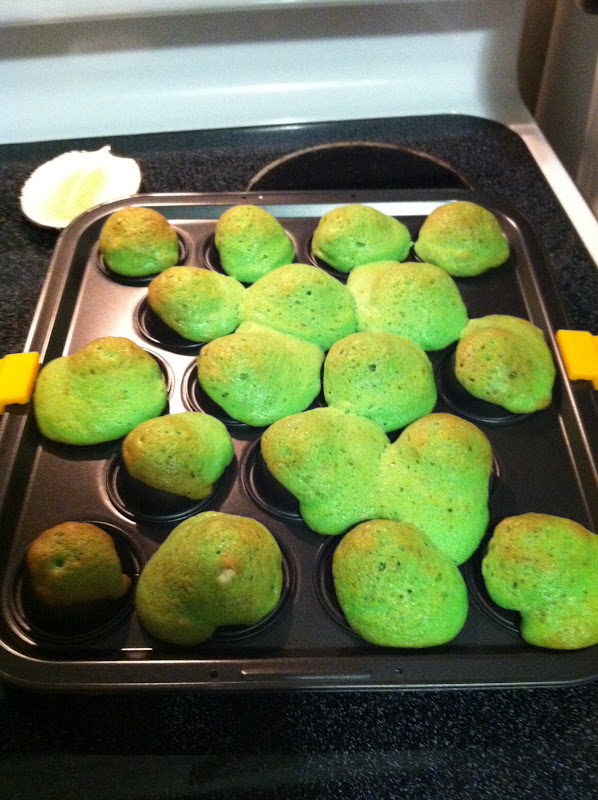
For some reason it hit me today that this month is flying by....at lightening speed.  In fact the first quarter of the year is almost over.  Where has the time gone?  Maybe it has something to do with the theory that time flies when you're having fun :)  I hear people say that as you get older times goes by faster.  I like my the fun theory much better than the one pointing out that I'm getting older.  Speaking of getting older this last weekend my dad celebrated another birthday.  In prepping for the big party I volunteered for cake detail.  I planned on making my "green cake" again and have to say it turned out just as great as the first one.  But I also decided to try out my hand at making cake pops.  I have seen lots of websites and blogs with ways to make cake pops....but I was lucky enough that at Christmas my parents gave me a cake pop pan.

It's really pretty simple.  Mix the cake batter, fill the pan, toss in oven, bake, remove and decorate. 


I used white cake batter with
green food color


The cake pan comes with a top and bottom.  You fill the bottom so that each hole is filled with batter to the level of the pan.  Put the top on and clip together with two silicone clips that come with the pan.  The top has tiny holes in the top so that extra batter can escape and not cause the pops to deformed.  I followed the directions for baking that come with the pan, 25 minutes maybe, then removed from oven to cool.  My cake pan came with pop "sticks" but if you don't have any I know that Michael's sells them.  I melted white icing in the microwave and again followed the pan's instructions.  I dipped the handle in the icing and then stuck it into the individual cake pops.  Once on the stick I removed the pops from the pan and dipped the pops into the melted icing.  Then I sprinkled them with sprinkles I already had at the house. 


When they came out of the oven the top
looked like this


After some icing and sprinkles (sorry it's blurry) and please excuse
my cluttered counter


Hello Mr. Cake Pop


Now here is the kicker....I made these the night before and had them all packaged up to go.  But the next morning in our rush to get out of the door......we forgot them at home!  And we didn't realize it until we were already at my sister's house :(   The good news is that we at least still had the cake and we were able to chow down on that.


And since we didn't want the cake pops to go to waste we have been eating them up this week.  Just the right amount of something sweet to tame the sugar craving after dinner. 


She LOVES them.  In fact it's one of
the few things she requests
to eat
 So yea that is the first of my experiences with making cake pops.  Nothing fancy and not nearly as creative as some other pops I've seen but we liked them all the same.  My only hope now is to find out how to make brownie pops!

Tuesday, March 6, 2012

Easy Peasy St. Paddy Day Cake

With St. Patrick's Day right around the corner how about something really easy and cute at the same time?  I am NO domestic goddess so if you are expecting a made from scratch recipe....not gonna happen here.  But mine ARE made with love and thank goodness for me my kids are happy and content with just about anything I pull out of the oven :)

I start with the basics....white cake mix (brand doesn't matter), green food coloring (seems like the more the better), white frosting, and sprinkles!  My sprinkles were mini chocolate chips in a rainbow of colors. 


I followed all the directions on the box for mixing the cake but added a step with mixing in the green food color.  Then I baked per instructions.  I used a bunt pan so that at the end I could just pour on the icing.  Plus I like the fun shape that comes out when I'm done. 


Once out of the oven I allowed the cake to cool and dumped it out on to a plate.  Then the fun part!  I put about half the icing in a measuring cup and melted it for about 20 seconds in the microwave.  Then I just poured it over the cake.  I didn't want to toally hide the green cake so that is why I used half.  Plus I'm not a huge fan of tons of icing.  Then I poured on the sprinkles  :) 


And that is my easy peasy cake....I just like to make woulds rhyme....makes me happy.  I think for Easter I'll try pink or purple!  Have a great day folks.